User Tutorial Guideline
A comprehensive guide to using the OnCert system effectively.
Introduction
Welcome to the OnCert Tutorial Guideline! This document provides step-by-step instructions on how to effectively use our system. Whether you are a new user or looking for a refresher, this guide will help you navigate the system's core features.
Getting Started
Accessing the System
- Navigate to the system's login page at the designated URL.
- Enter your username and password. If you do not have credentials, please register a new account and fill in the form.
- Click the "Log In" button.
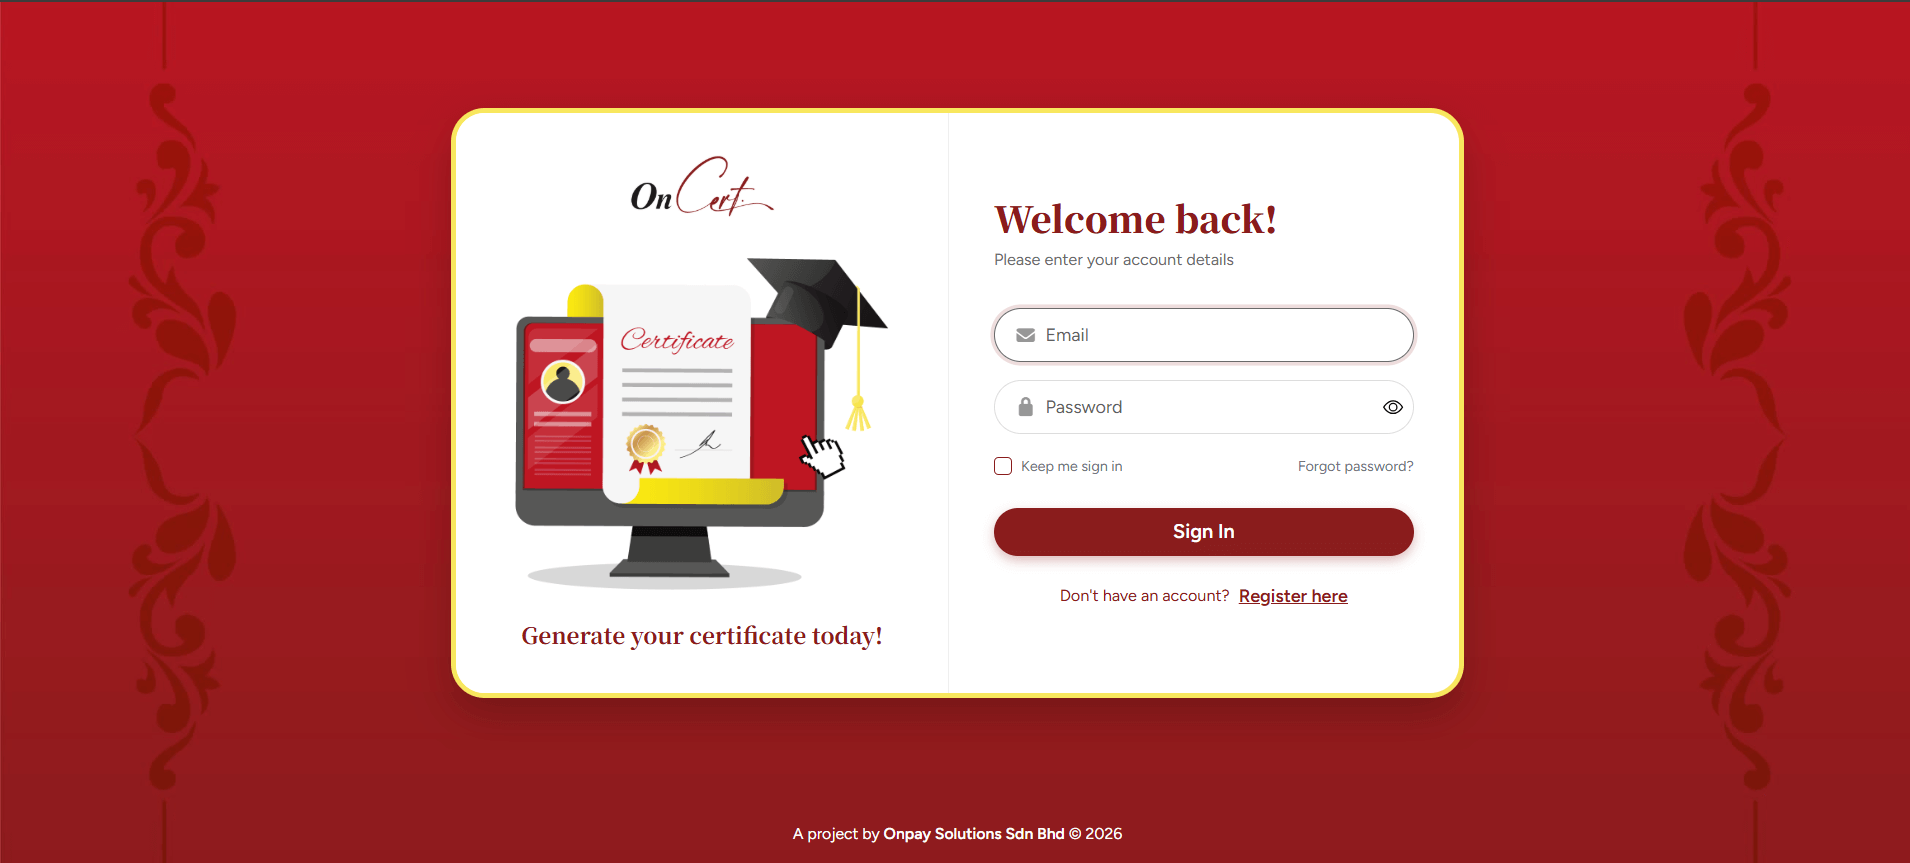 Figure 1: System Login Page
 System Overview
Upon successful login, you will land on the main Dashboard. The dashboard provides a snapshot of your system status (e.g., credit).
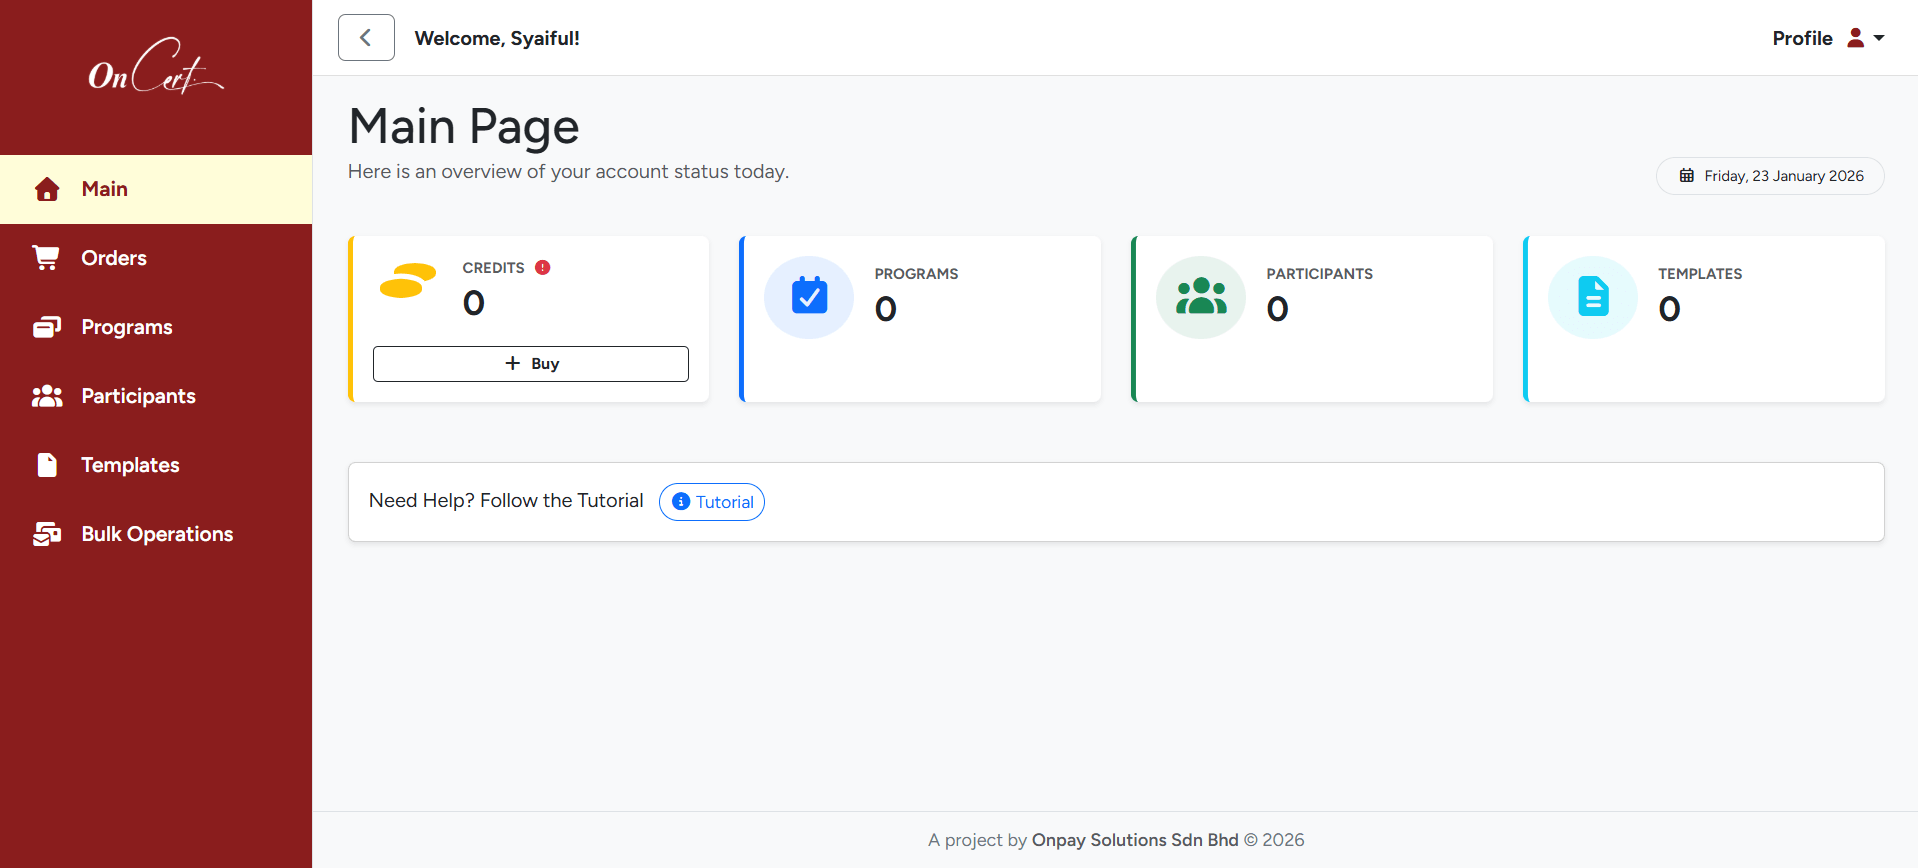 Figure 2: Main Dashboard Overview
 The main navigation bar is located on the left side of the screen and includes the following sections:
- Main: Overview of account status.
- Orders: View and manage credit purchases.
- Programs: Manage certification programs.
- Participants: Manage program participants.
- Templates: Manage certificate design templates.
- Bulk Operations: Manage bulk certificate generation and sending.
Credit Subscriptions
For all the credit purchased, the invoice will be sent to the user's phone number and email.
Purchasing Credits
- From the main navigation bar, select Orders or click on the main dashboard 'Buy' button on the credit card.
- Inside the Order page, click the Buy Credit button to purchase a credit.
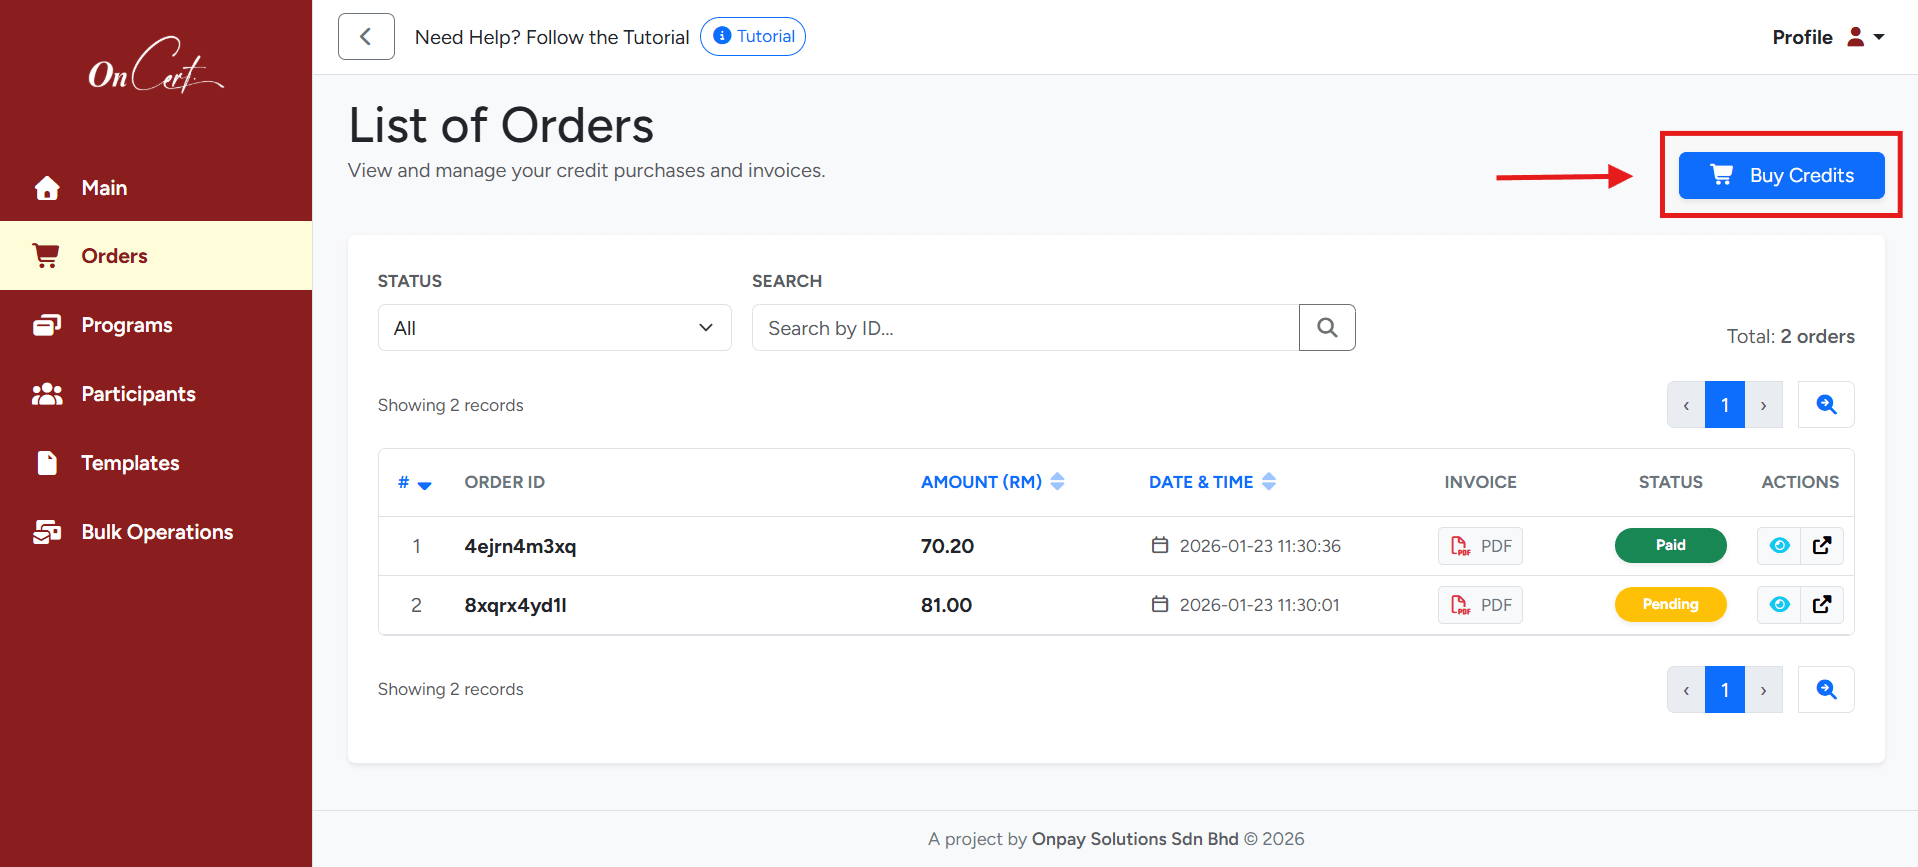 Figure 3: Order List Page
 - Then it will directly go to the credit page. This is where the user can purchase their credits based on the package system provided.
- Click Purchase Now to buy the credits.
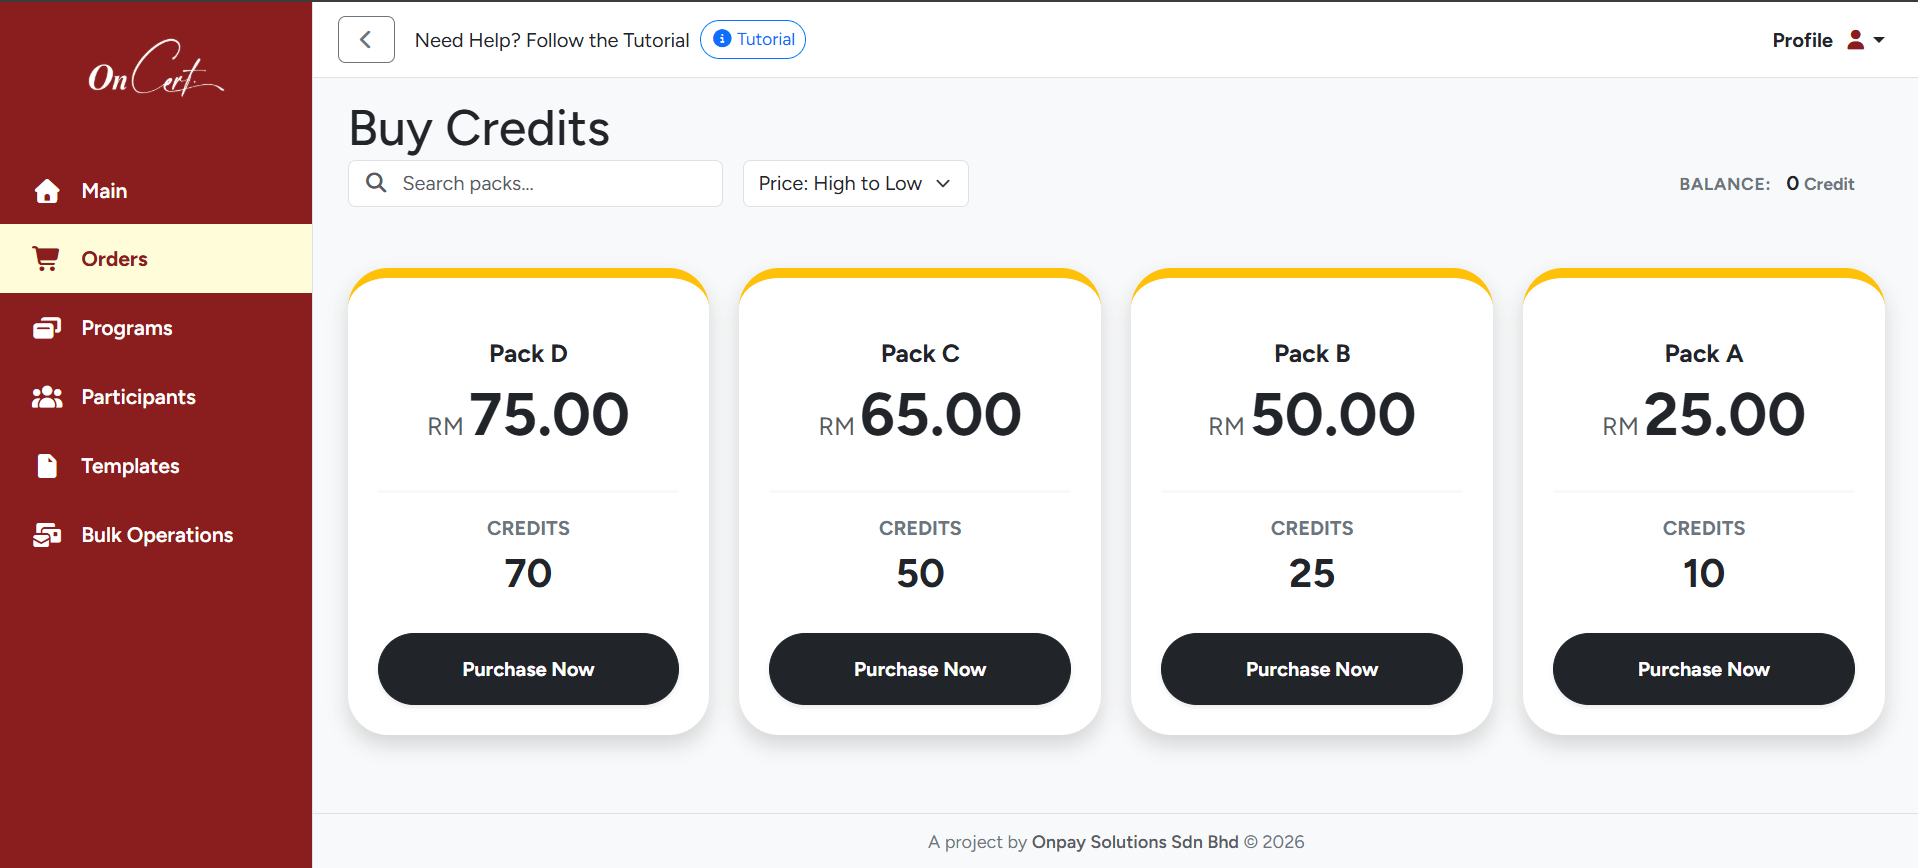 Figure 4: Select Credit Package
 - Then click Proceed and the system will guide you to the payment gateway.
Note: Remember to read our Privacy Policy & Terms of Service before making a payment.
Managing Invoices
- Inside the Order page, after purchasing the credits, users can filter and search to check their status.
- Users can also download the invoice by clicking the PDF button in the invoice section.
- Click on the Eye icon to see the order's details while the Arrow icon will lead the user to payment gateway status.
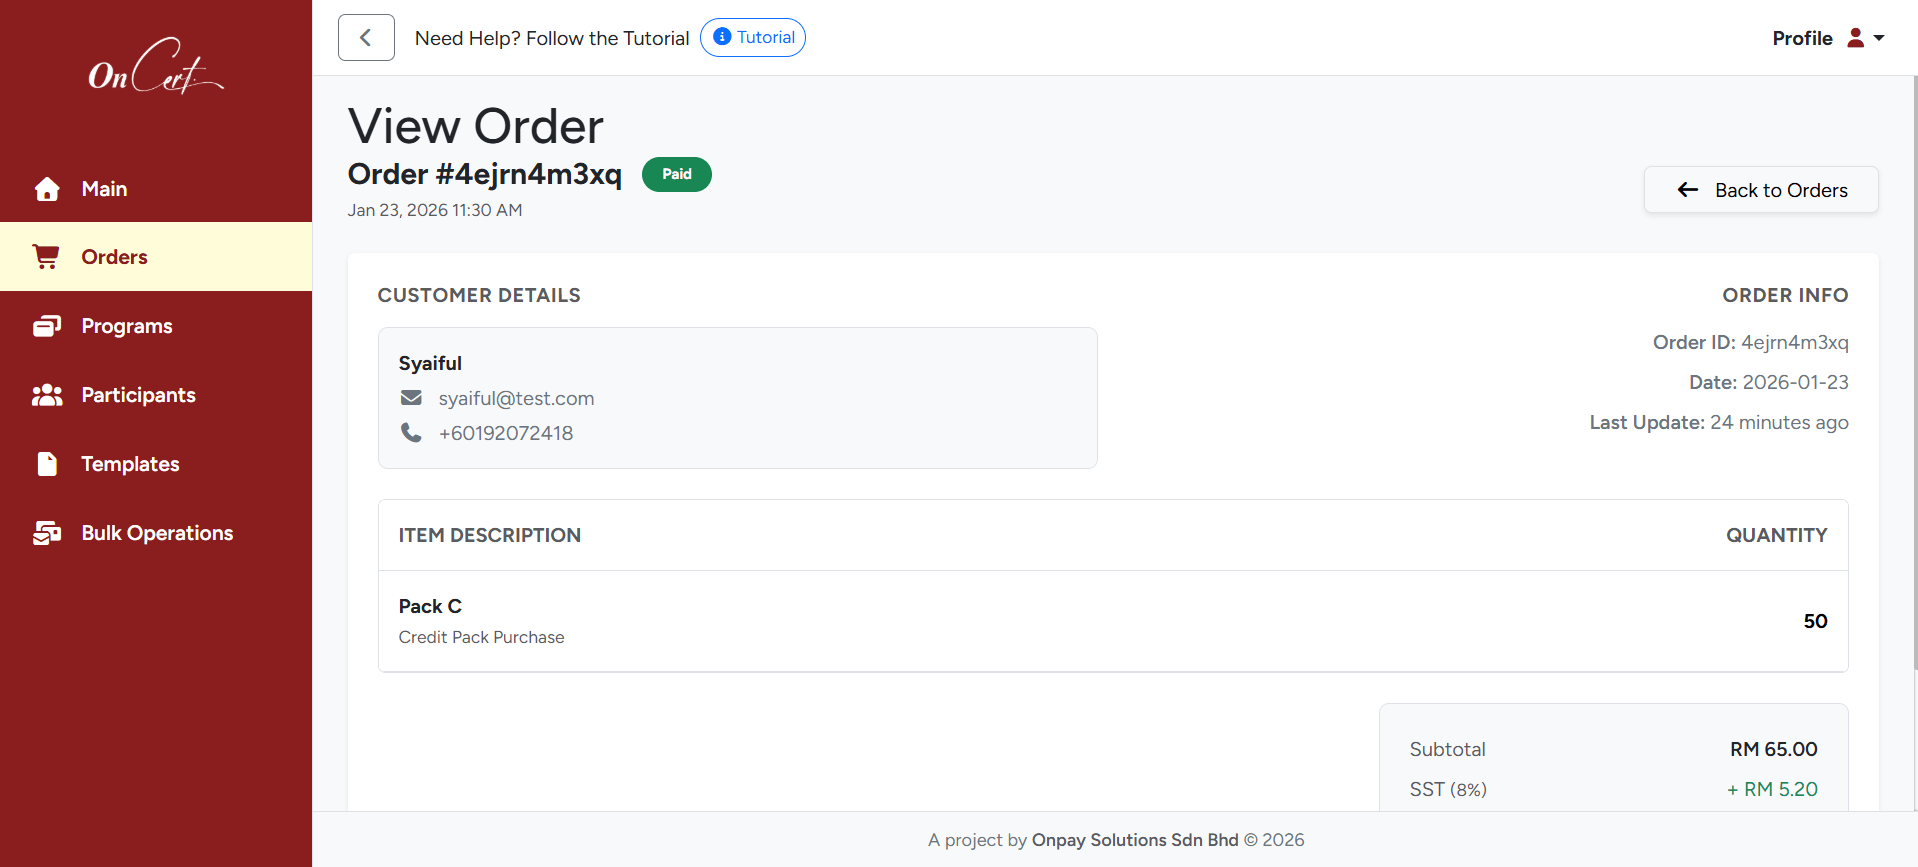 Figure 5: Order History and Invoices
 Programs
- Inside the Programs page, it will show a list of programs that users have added.
- To add a new program, click the Add Program button.
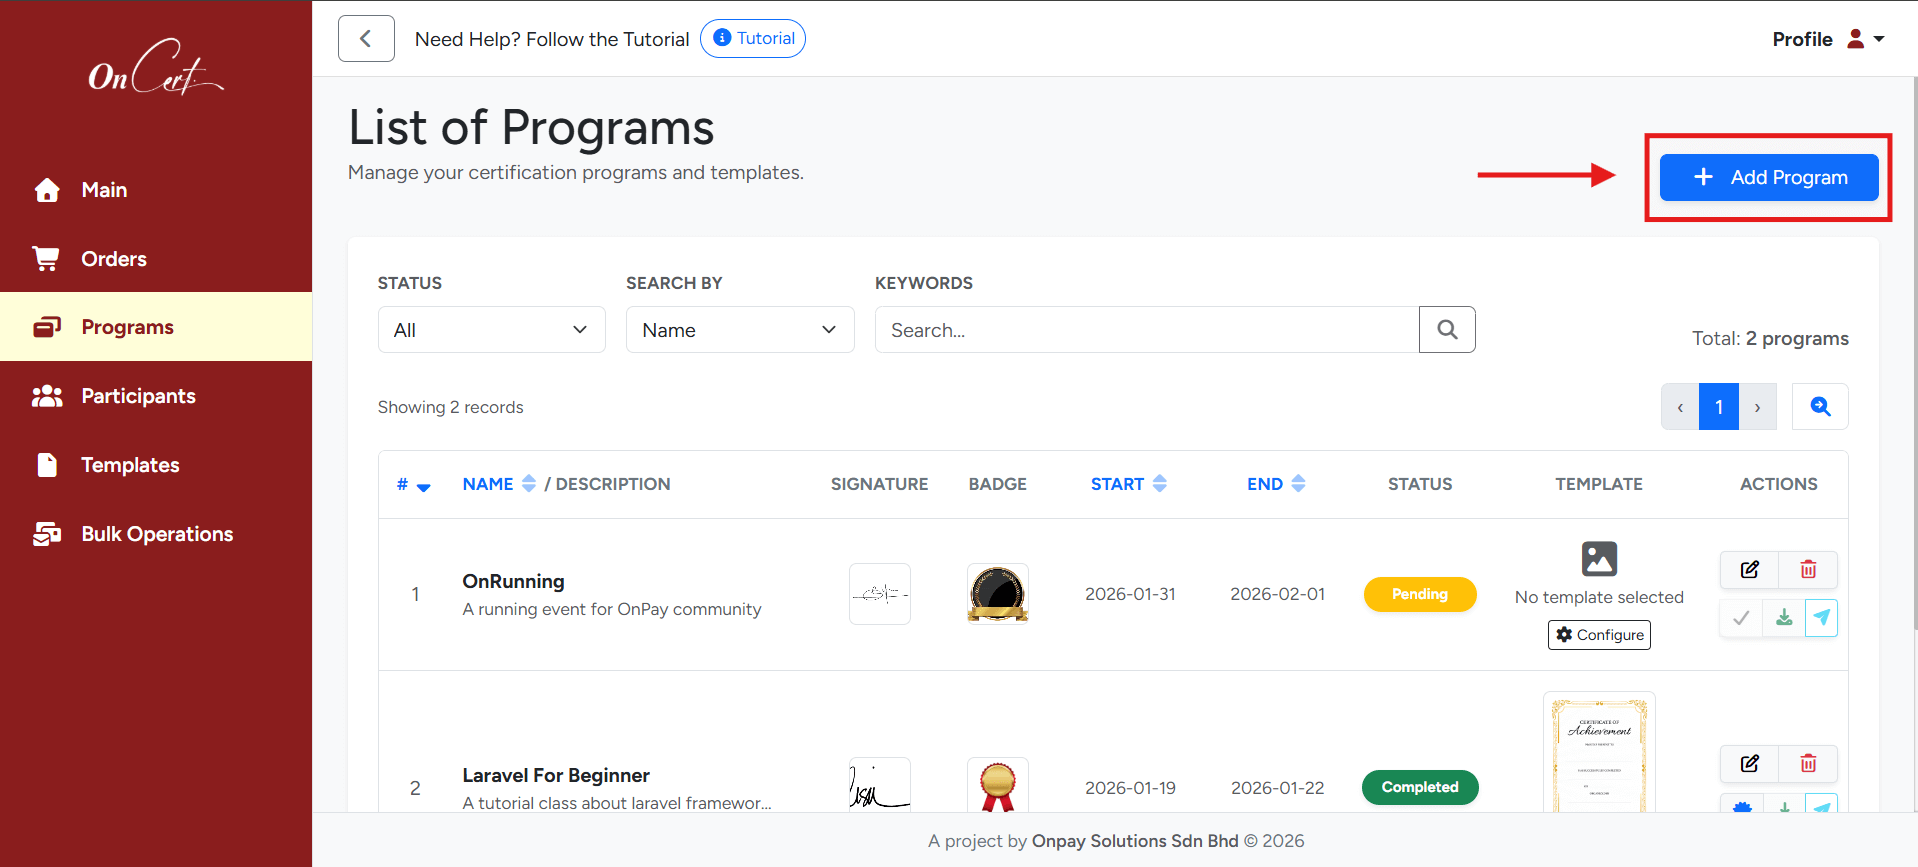 Figure 6: List of Programs
 - Inside the add program form, please fill in all the program's details before saving the program.
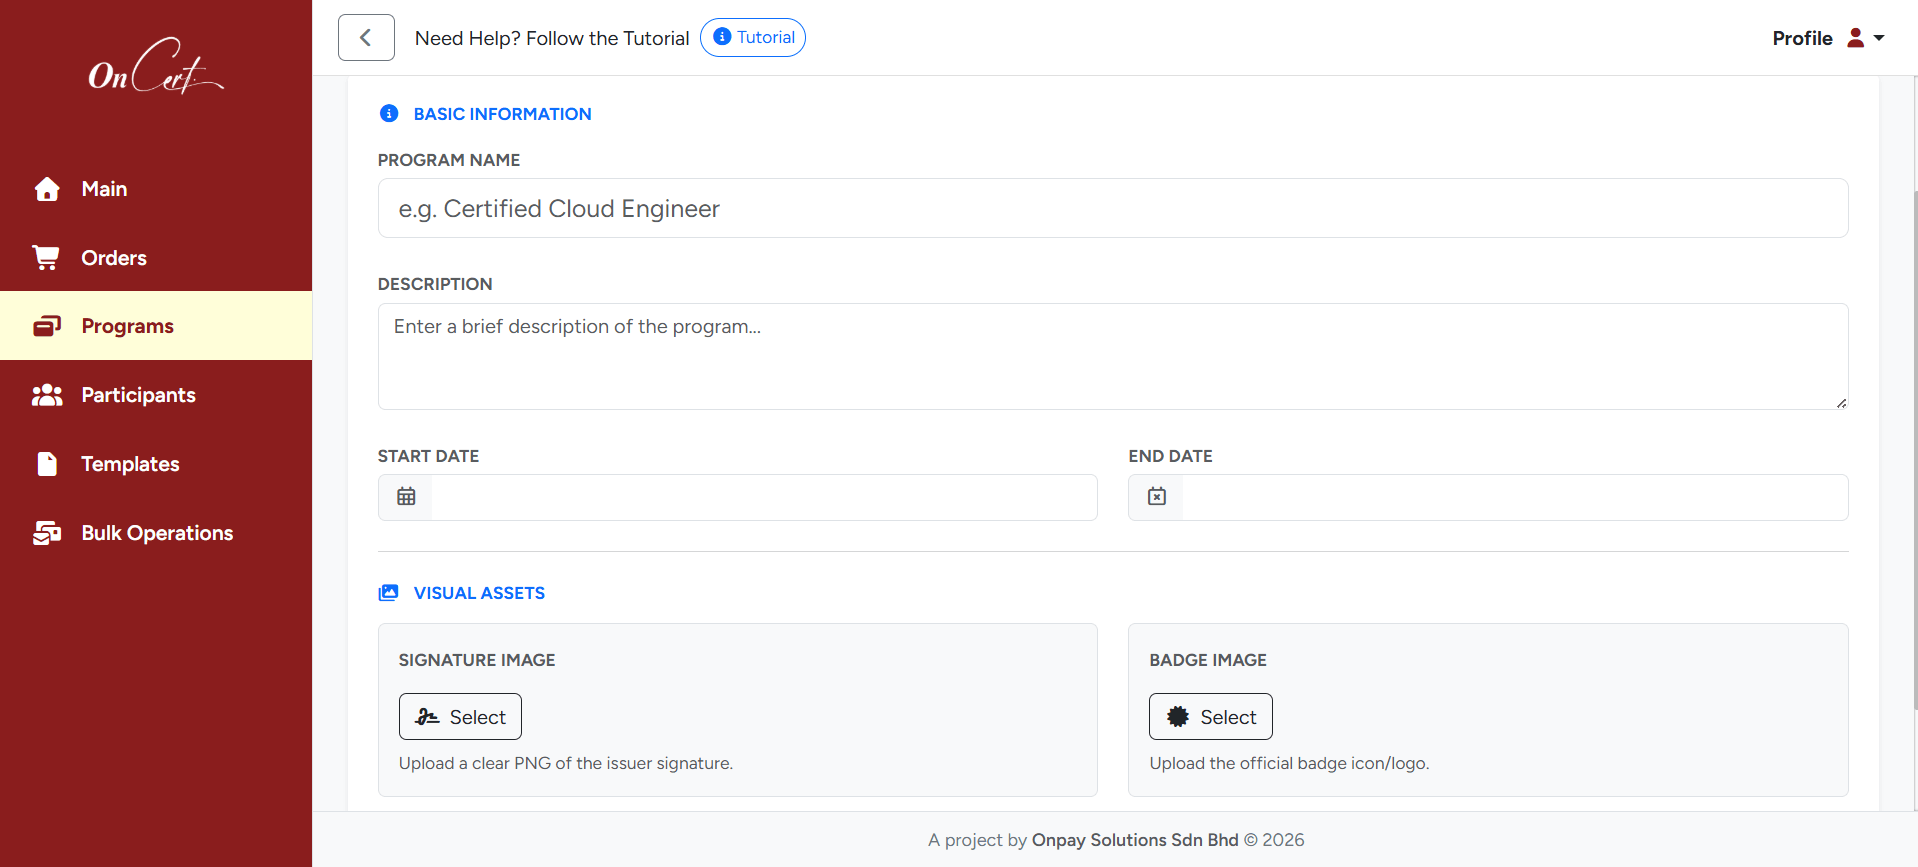 Figure 7: Add Program Form
 - To view or edit the program, click the Pencil icon. If the user wants to remove the program, click the Bin icon to delete.
Participants
- To manage participants, from the main navigation bar, select Participants . Then inside the page, users can filter by selecting the program to view all the participants that participated in a specific program.
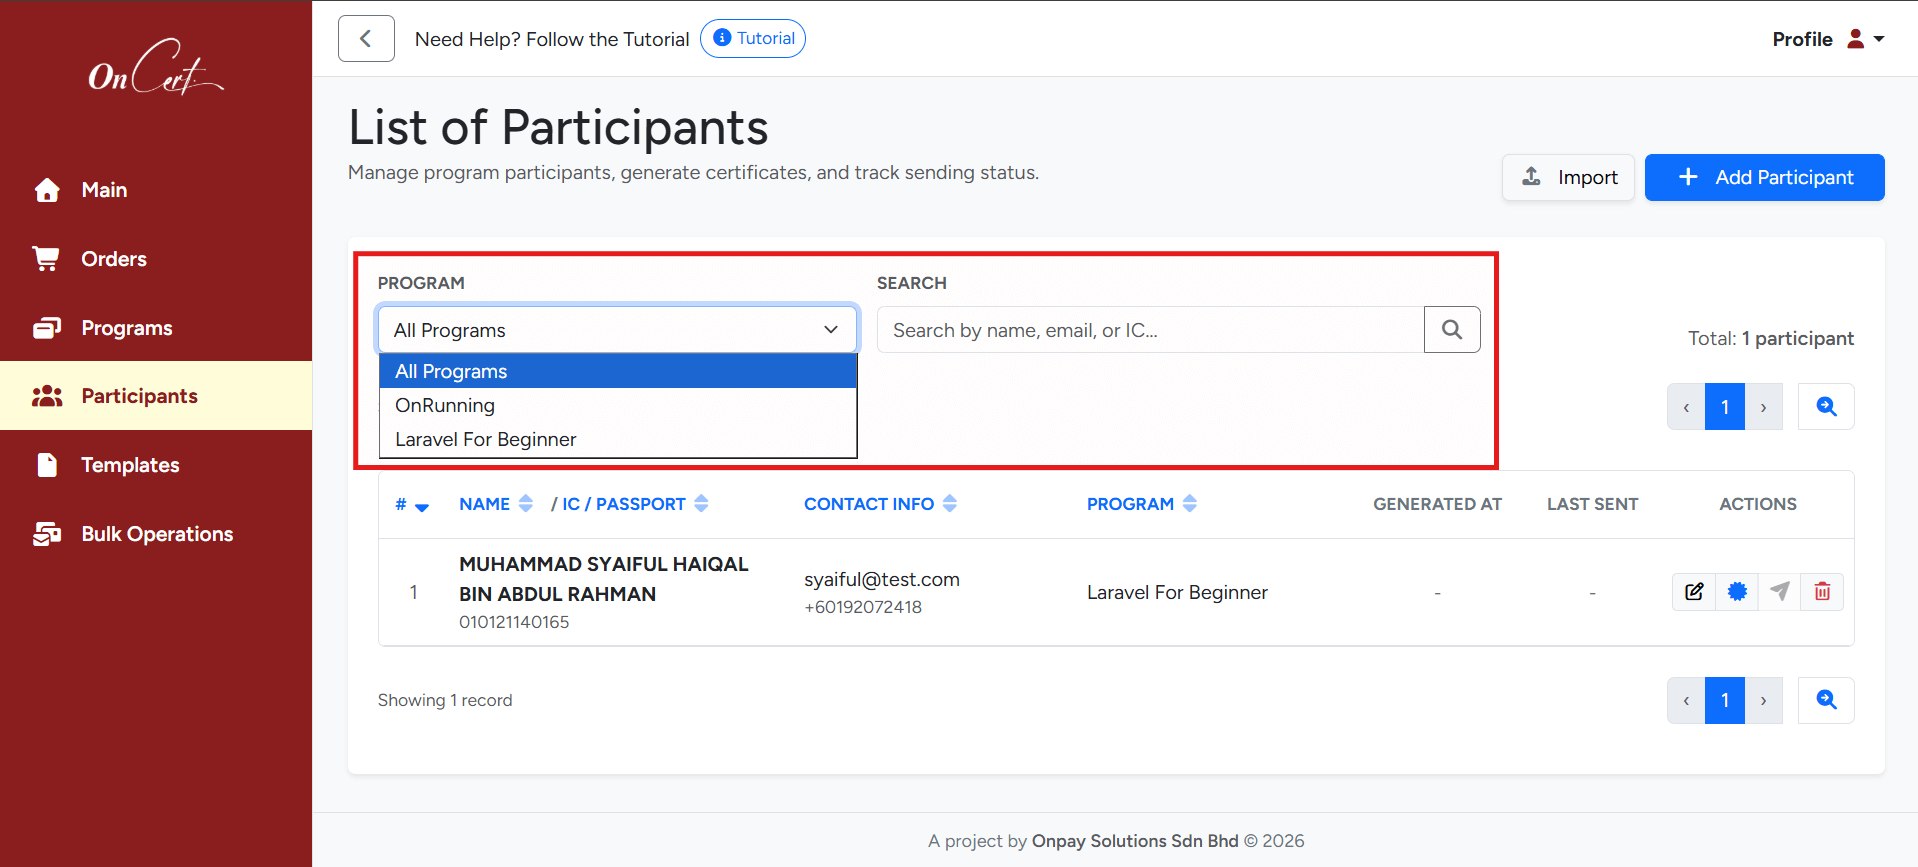 Figure 8: Filter Participants by Program
 - To add a participant, click the Add Participant button or import directly from the user's device folder.
Note for Import: Make sure the file is a CSV or Excel file only and the maximum participant count is up to one thousand (1000) participants.
The imported information must be in the following order:
- Name
- IC/Passport
- Email
- Phone Number (Make sure the country code is set in front of the number)
- Choose the program and fill in all the participant's information then click the Save Participant button.
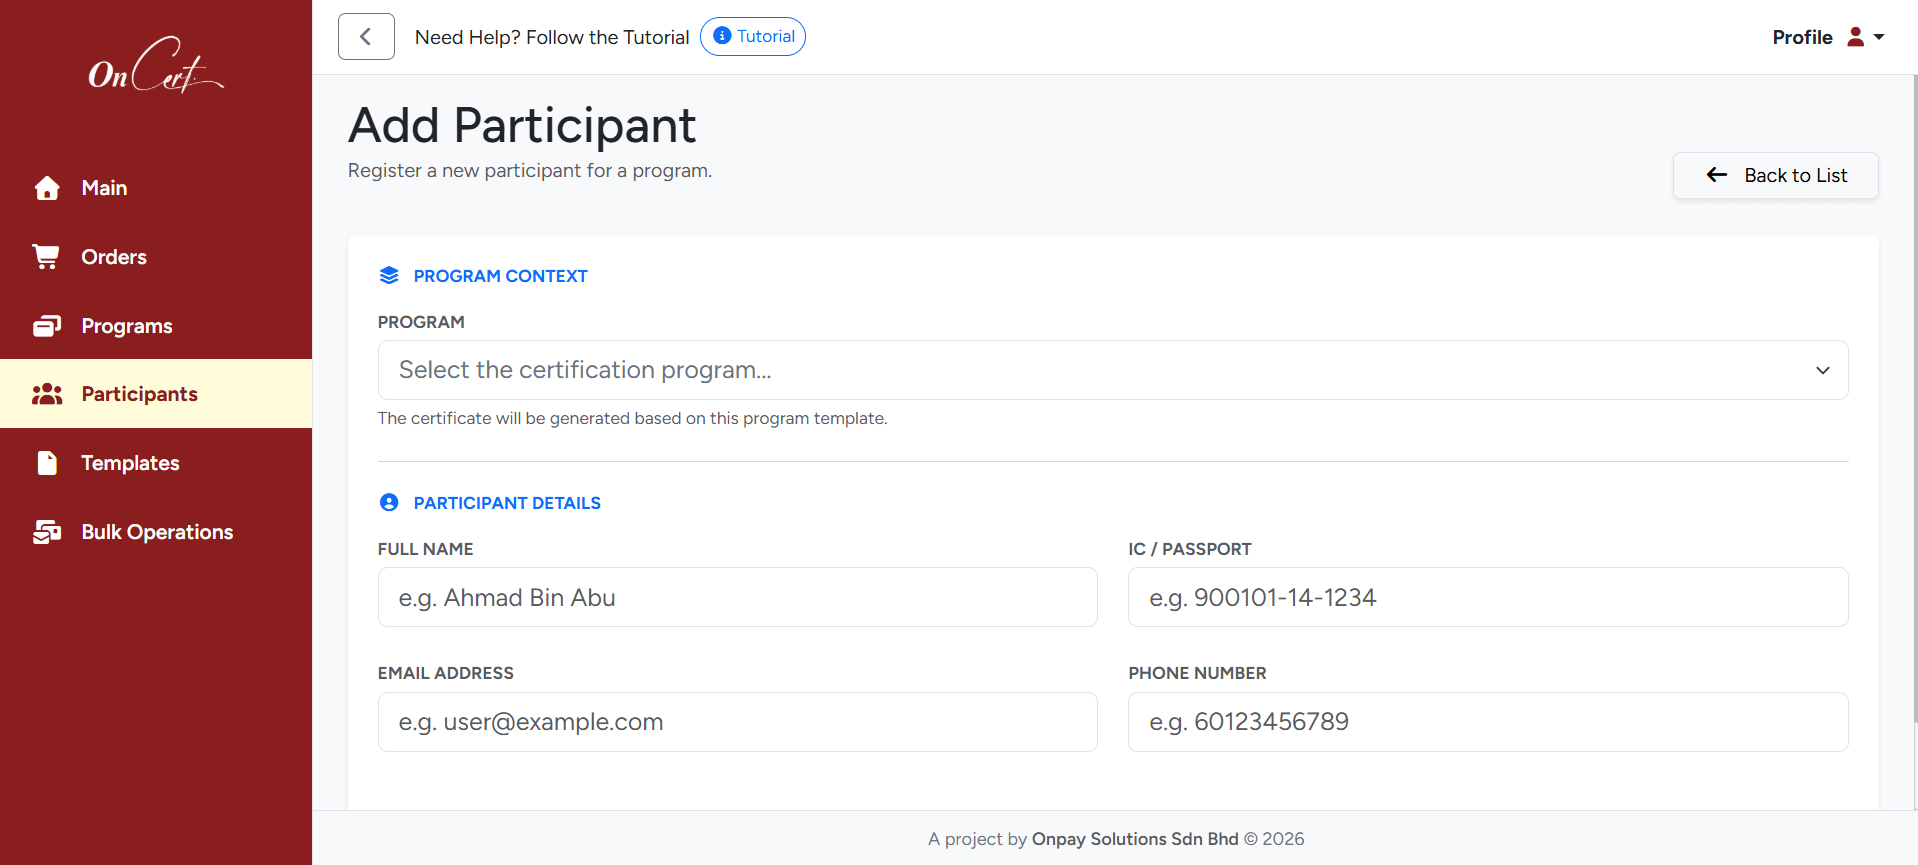 Figure 9: Add Participant Form
 - To edit participant details, click the Pencil icon. If the user wants to remove the participant, click the Bin icon to delete.
Templates
This section is where users can upload their custom or personal template for generating the program's certificate.
- Navigate to Templates . Users will see the page where they can view the list of certificate templates. Users can filter by orientation (landscape or portrait) and also search by template name.
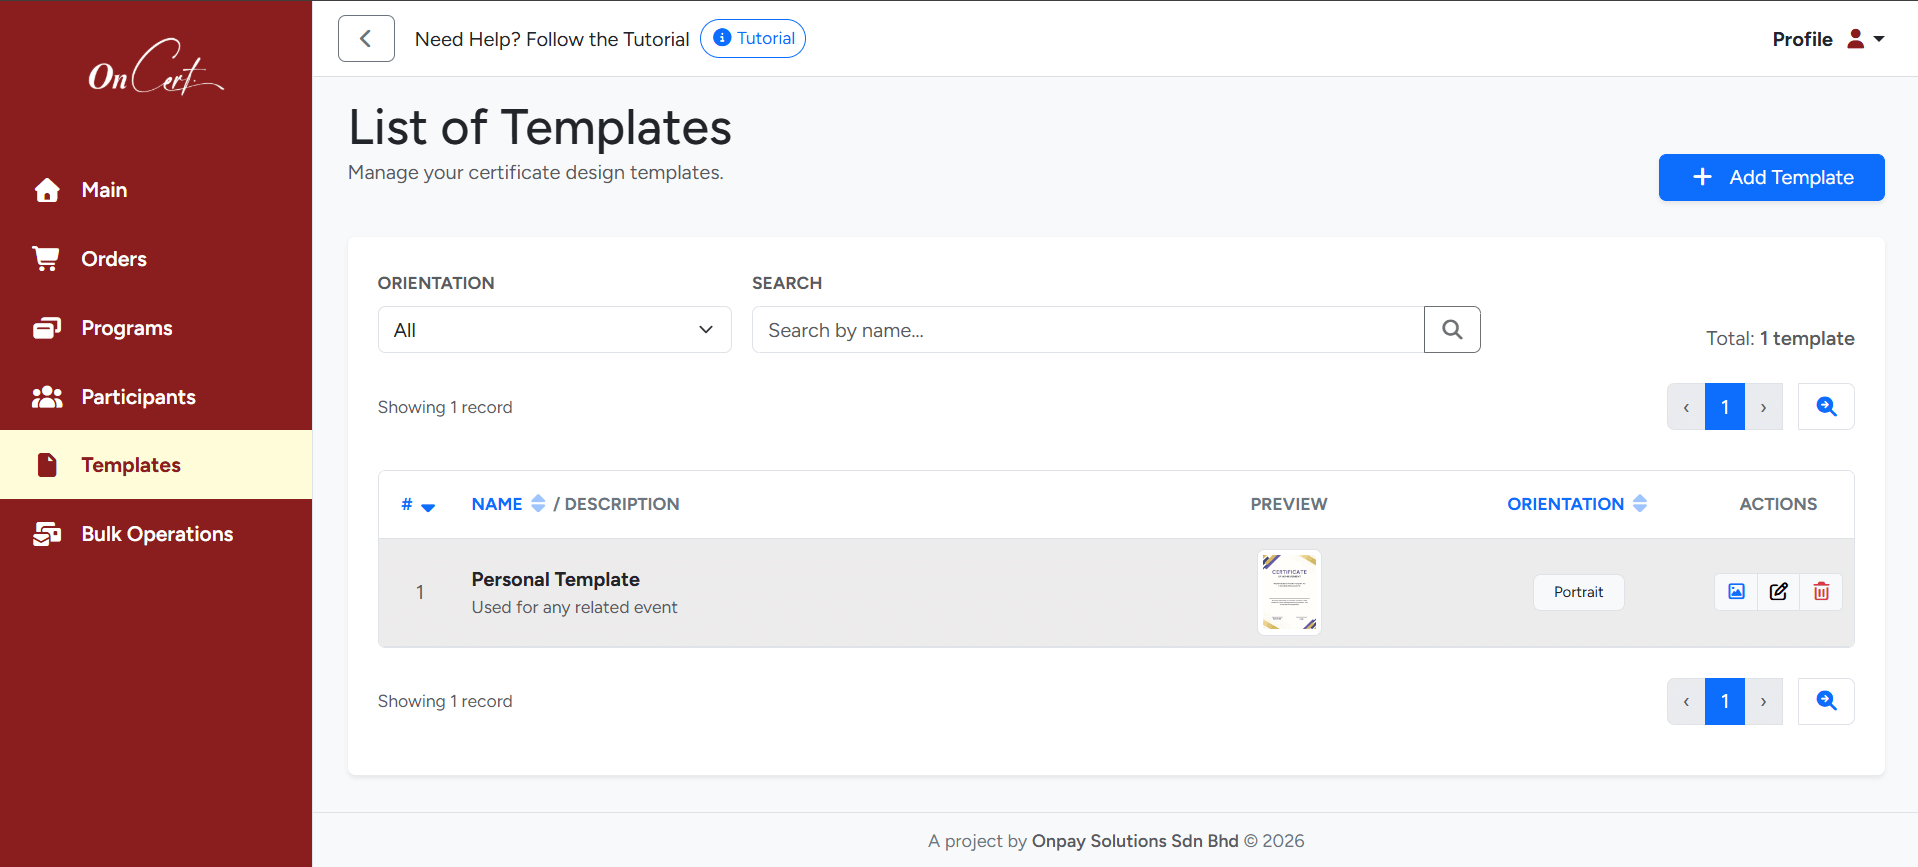 Figure 10: List of Templates
 - Click the Add Template button to add the user's own template. Then fill in all the details for the template.
- Please follow the recommendations to have a proper certificate layout.
- Click Save Template to save the custom template.
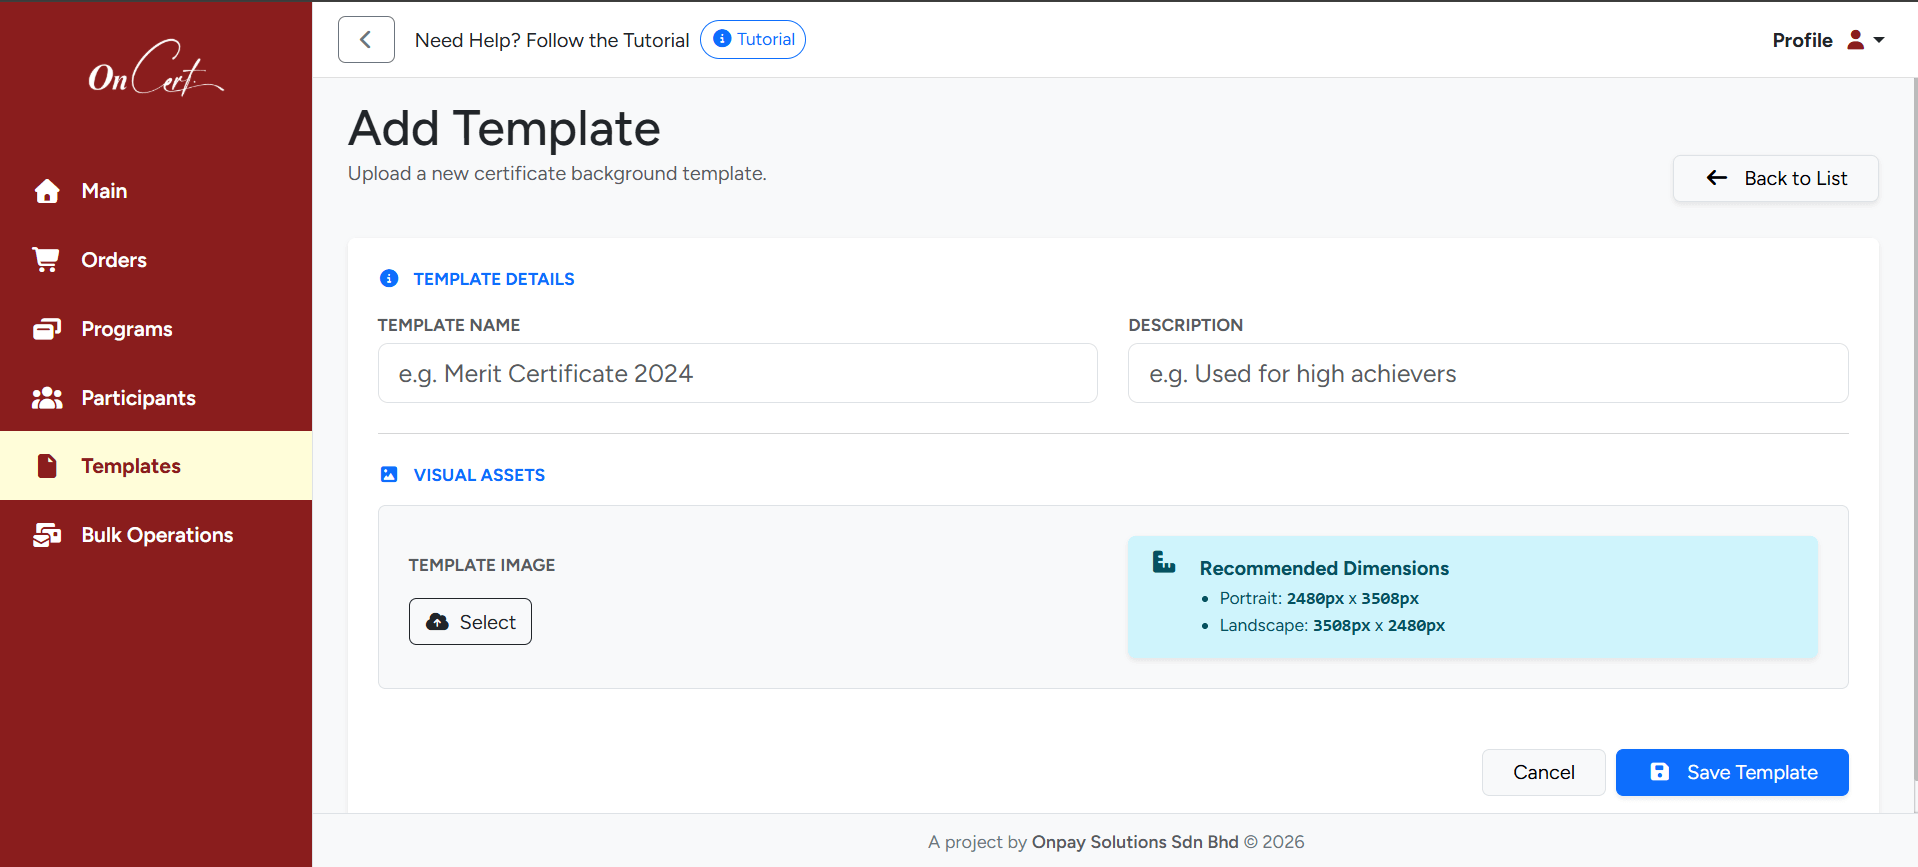 Figure 11: Add Template Form with Dimensions
 Generate Certificates
After adding all the necessary information, users can proceed to generate the certificate and configure the certificate template.
Configure Template
- Navigate to Programs . In the template section, there is a Gear icon if the user has not chosen any template yet. Click the icon to go to the certificate configuration page.
Note: Please 'Select Template' first before configuring the certificate.
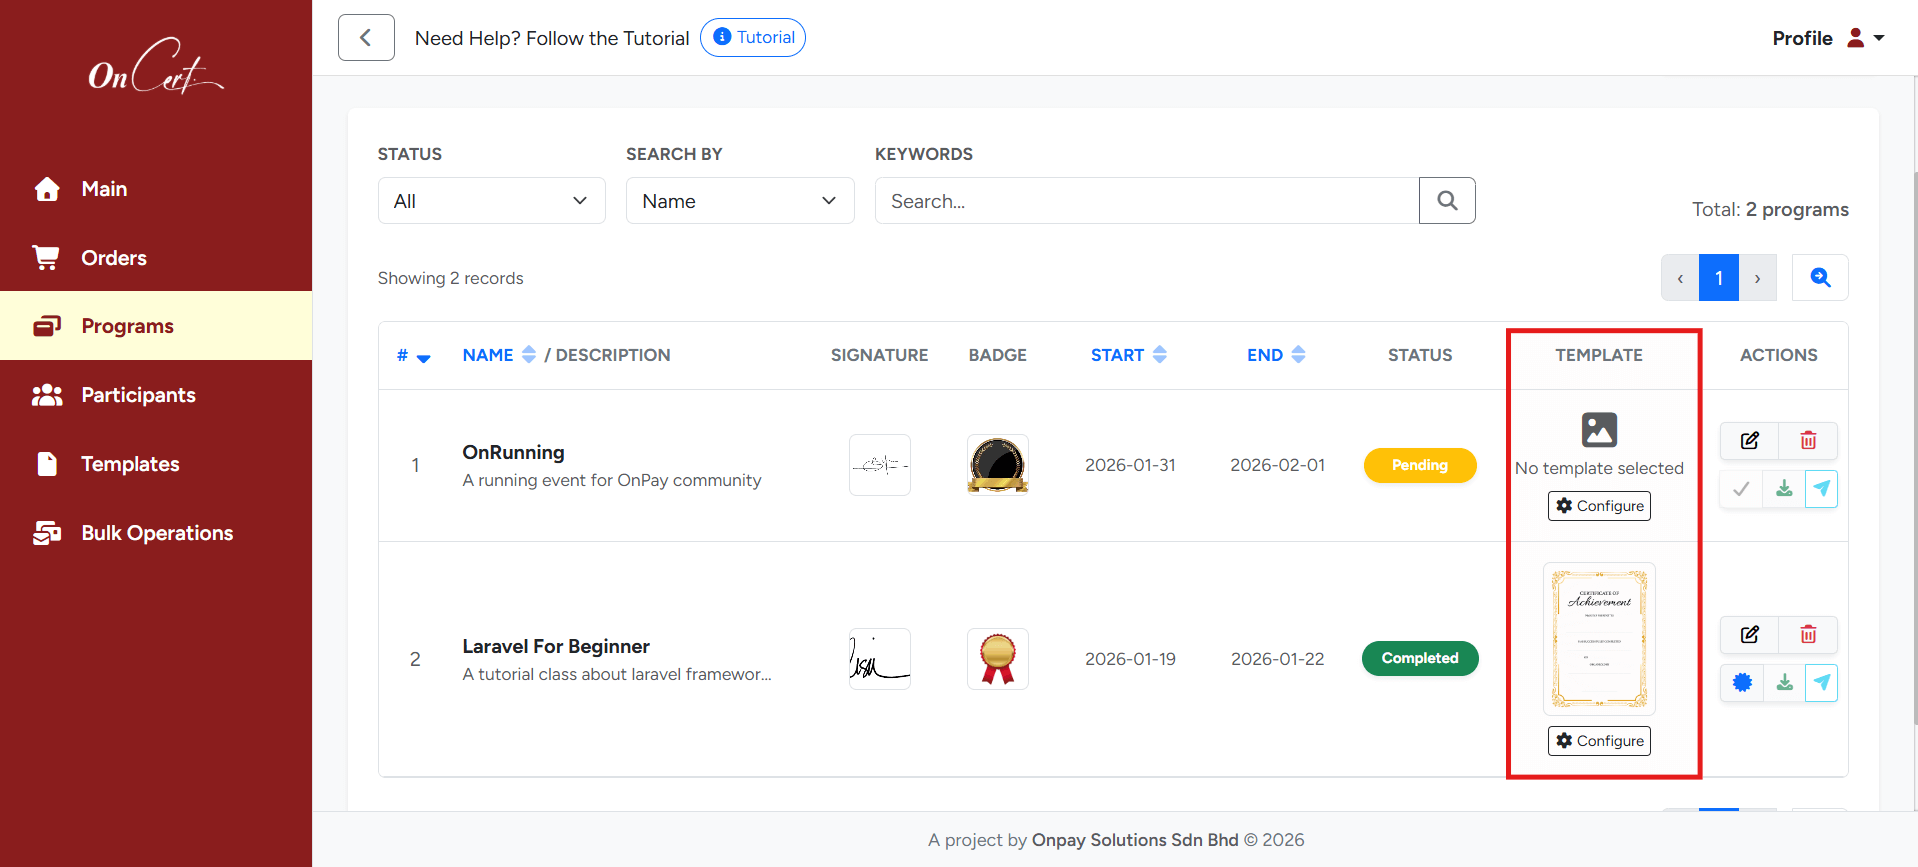 Figure 12: Select Program Template
 - In the certificate configuration page, there are 3 sections:
- Left section:
- Certificate Fields: The existing details of participant and program. Tick any fields to appear on the template.
- Custom Text Fields: Users can add their own text if needed (e.g., company name).
- Custom Image: Users can upload their own image if needed (e.g., logo).
- Middle section:
- Template Preview: Visual representation of the certificate.
- 'Select Template' button: Choose certificate template (Default or Custom).
- Right section:
- Field Setting: To modify all the fields that are used in the certificate template (Position, Font Size, Color, etc.).
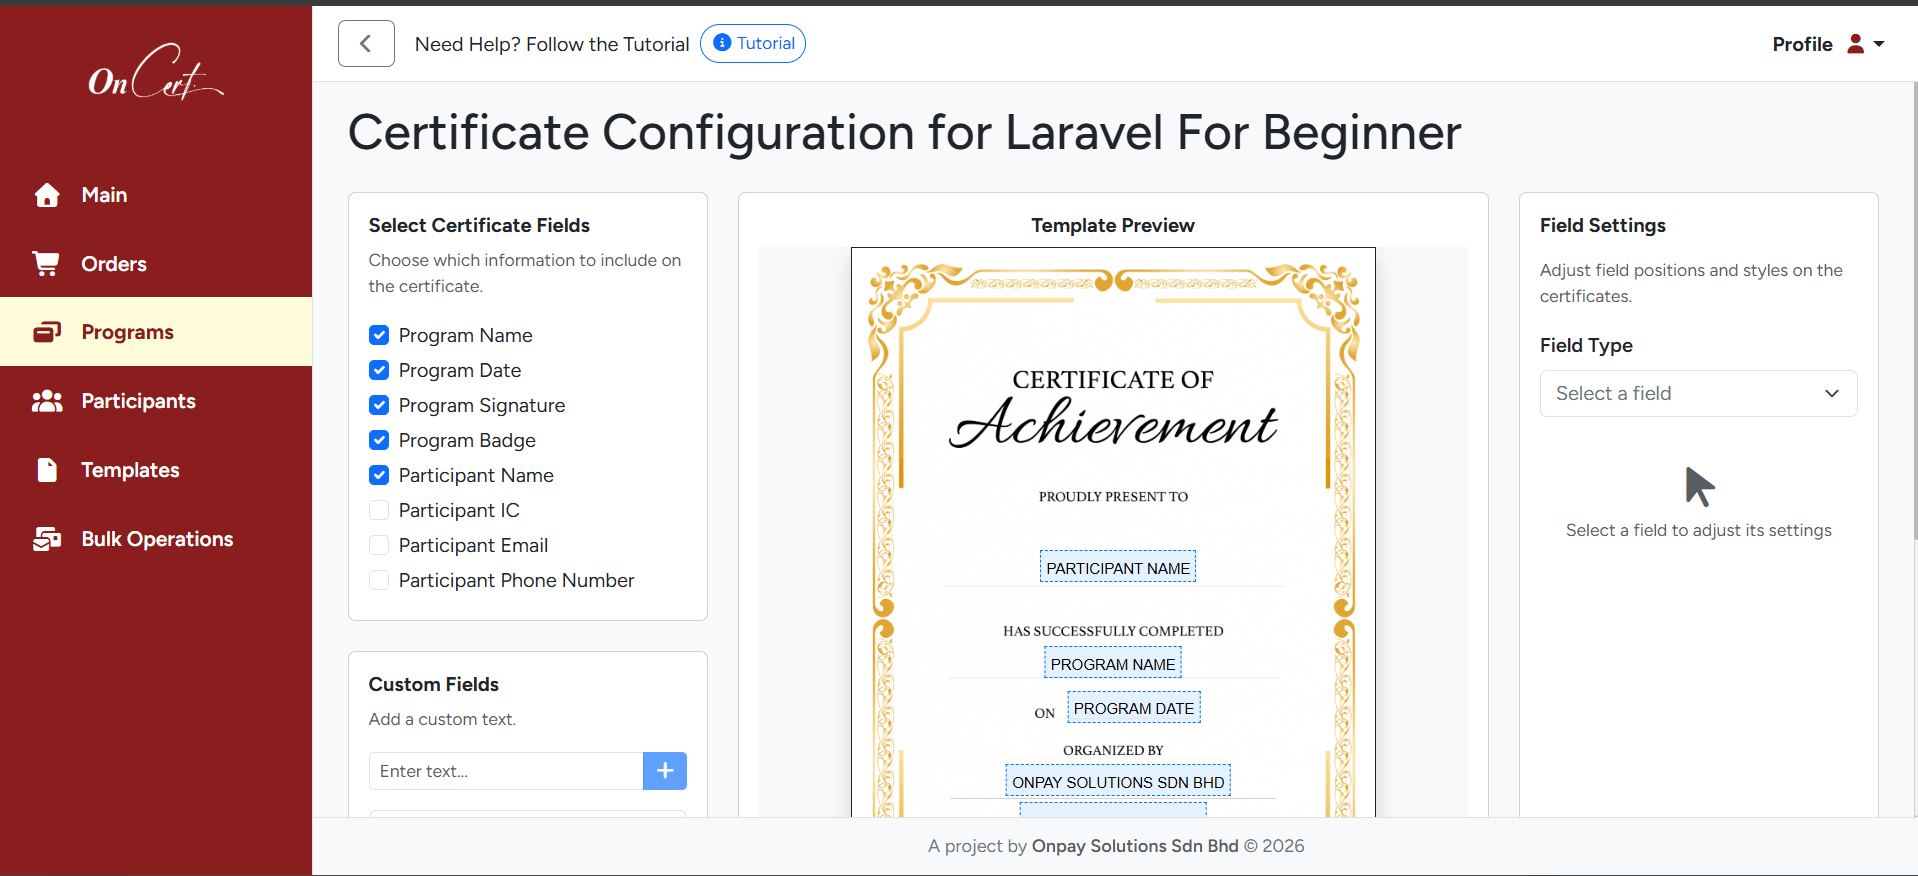 Figure 13: Certificate Configuration Interface
 Note: Please click 'Save Configuration' at the bottom of the page after configuring the certificate template.
Generate & Send Certificate
After finishing up the certificate configuration, users can generate the certificate and view it before sending it to participants.
- Navigate to Participants . In the action area, click the Badge icon button to generate the certificate. Click 'Yes' when the notification pops up to proceed.
- Users can download the certificate after it is generated and can view it again when needed by clicking the Eye icon button.
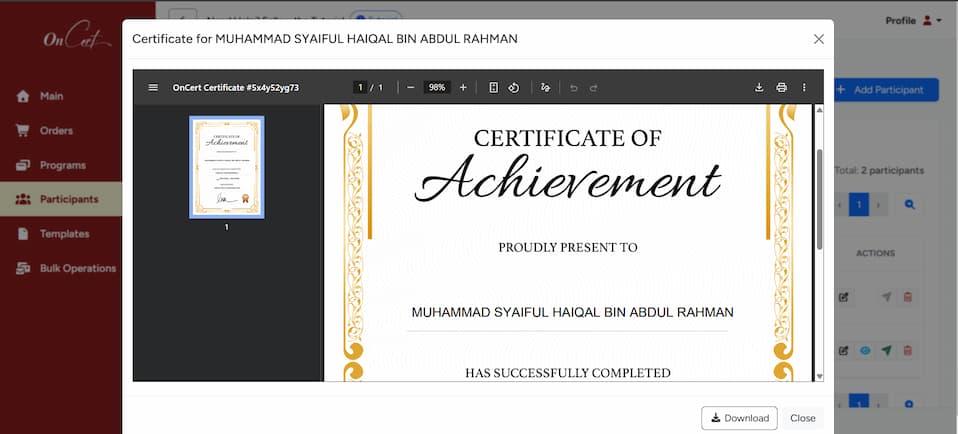 Figure 14: Certificate Preview
 - After that, users can send the certificate by clicking the Blast (paper plane) icon button, and the participant will receive it via email.
Bulk Operations
Bulk Generate & Send Certificate
This feature allows users to generate and send certificates to all participants in a program at once, instead of processing certificates individually. The bulk operation helps save time and ensures certificates are distributed efficiently.
Bulk Generation
- Navigate to Programs , then in the Actions column, click the Badge icon to start bulk certificate generation.
- Click Yes when the notification pops up to proceed.
- Once confirmed, the system will begin generating certificates for all participants under the selected program.
- When prompted, click Yes, go to progress page to view the bulk generation status. The system will redirect you to the Bulk Operation page, where you can monitor the progress.
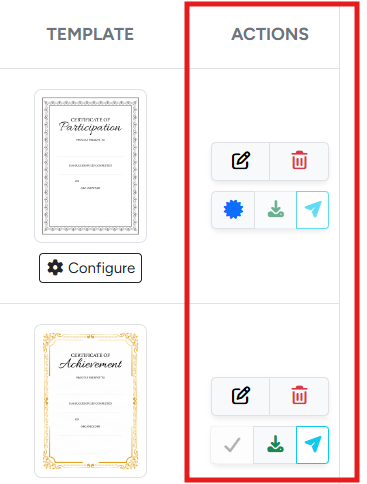 Figure 15: Bulk Operation
 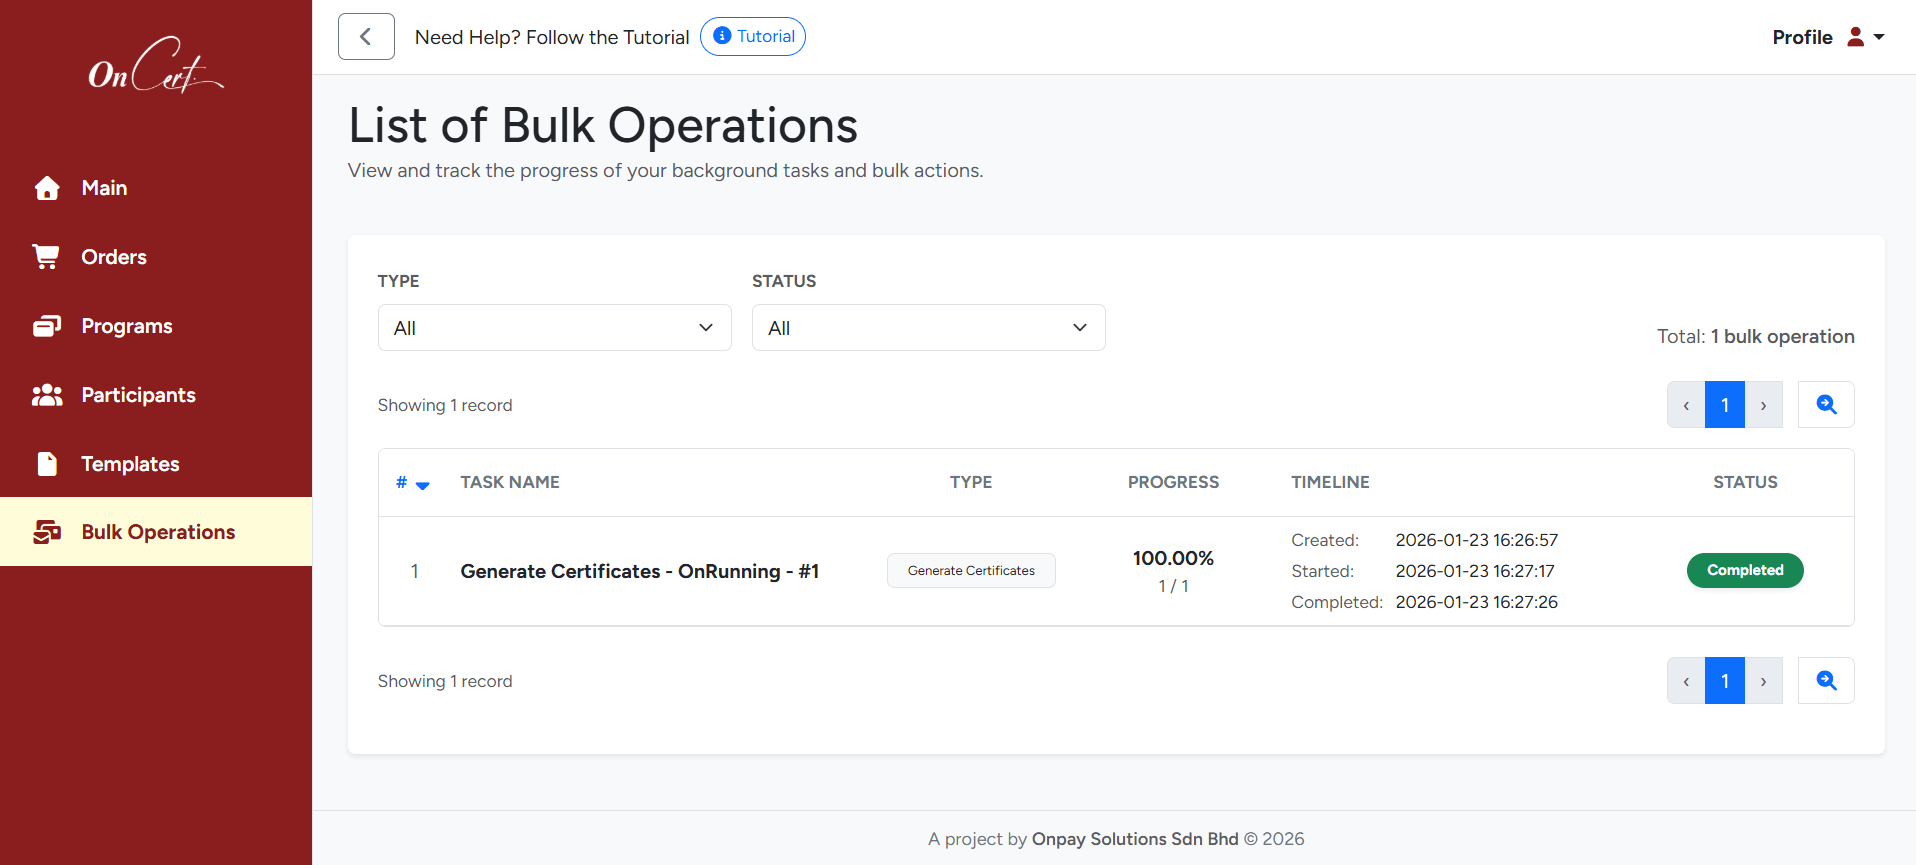 Figure 16: List of Bulk Operations
Note: Certificate generation may take some time depending on the number of participants.
Bulk Sending
After generation is complete, users can send certificates to all participants via email.
- Navigate back to Programs .
- In the Actions column, click the Paper Plane icon to send certificates in bulk.
- Click Yes when the notification pops up to proceed. The system will start sending certificates to all participants’ registered email addresses.
Figure 17: Bulk Operation Blast
Note: Bulk sending is only available after the bulk generation status is Completed .
Settings and Personalization
Updating User Profile
Users can update their personal information and preferences in the Settings section.
- Click on your profile icon or name in the top right corner.
- Select Account Profile .
- Under the Account Profile tab, users can update their details and change the language if needed. Click the Update Profile button to save.
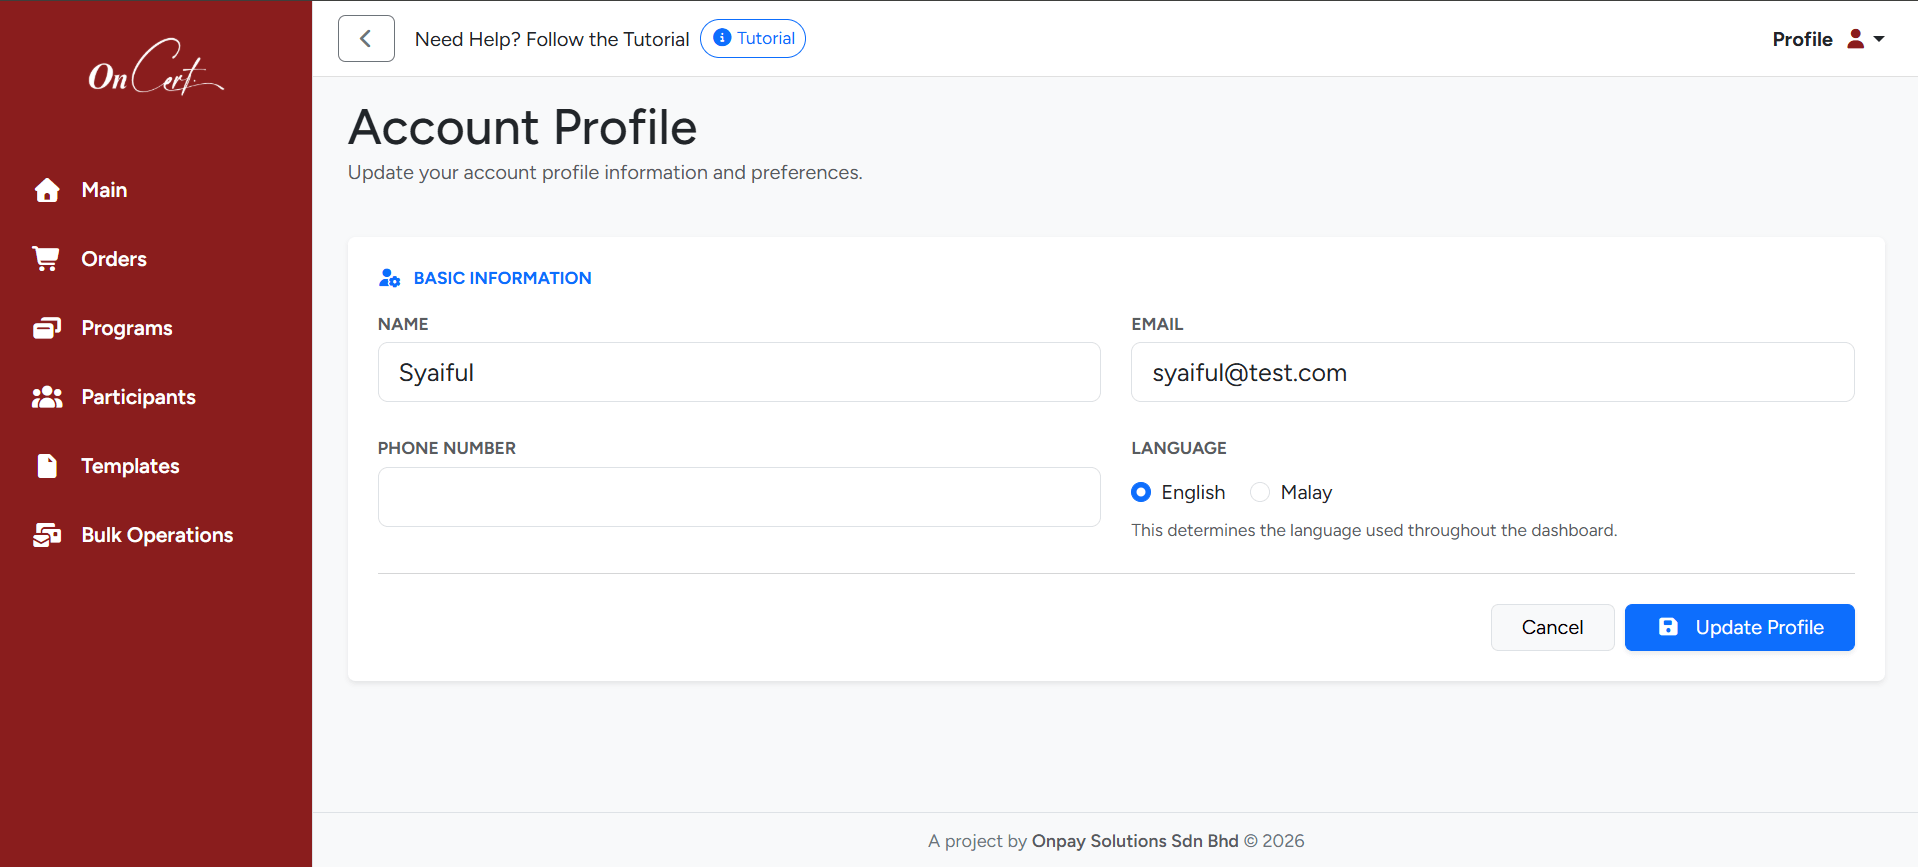 Figure 18: Account Profile Settings
 Change Password
- To change your password, navigate to the Change Password tab.
- Enter your old password, then enter and confirm your new password.
- Click the Change Password button to save.
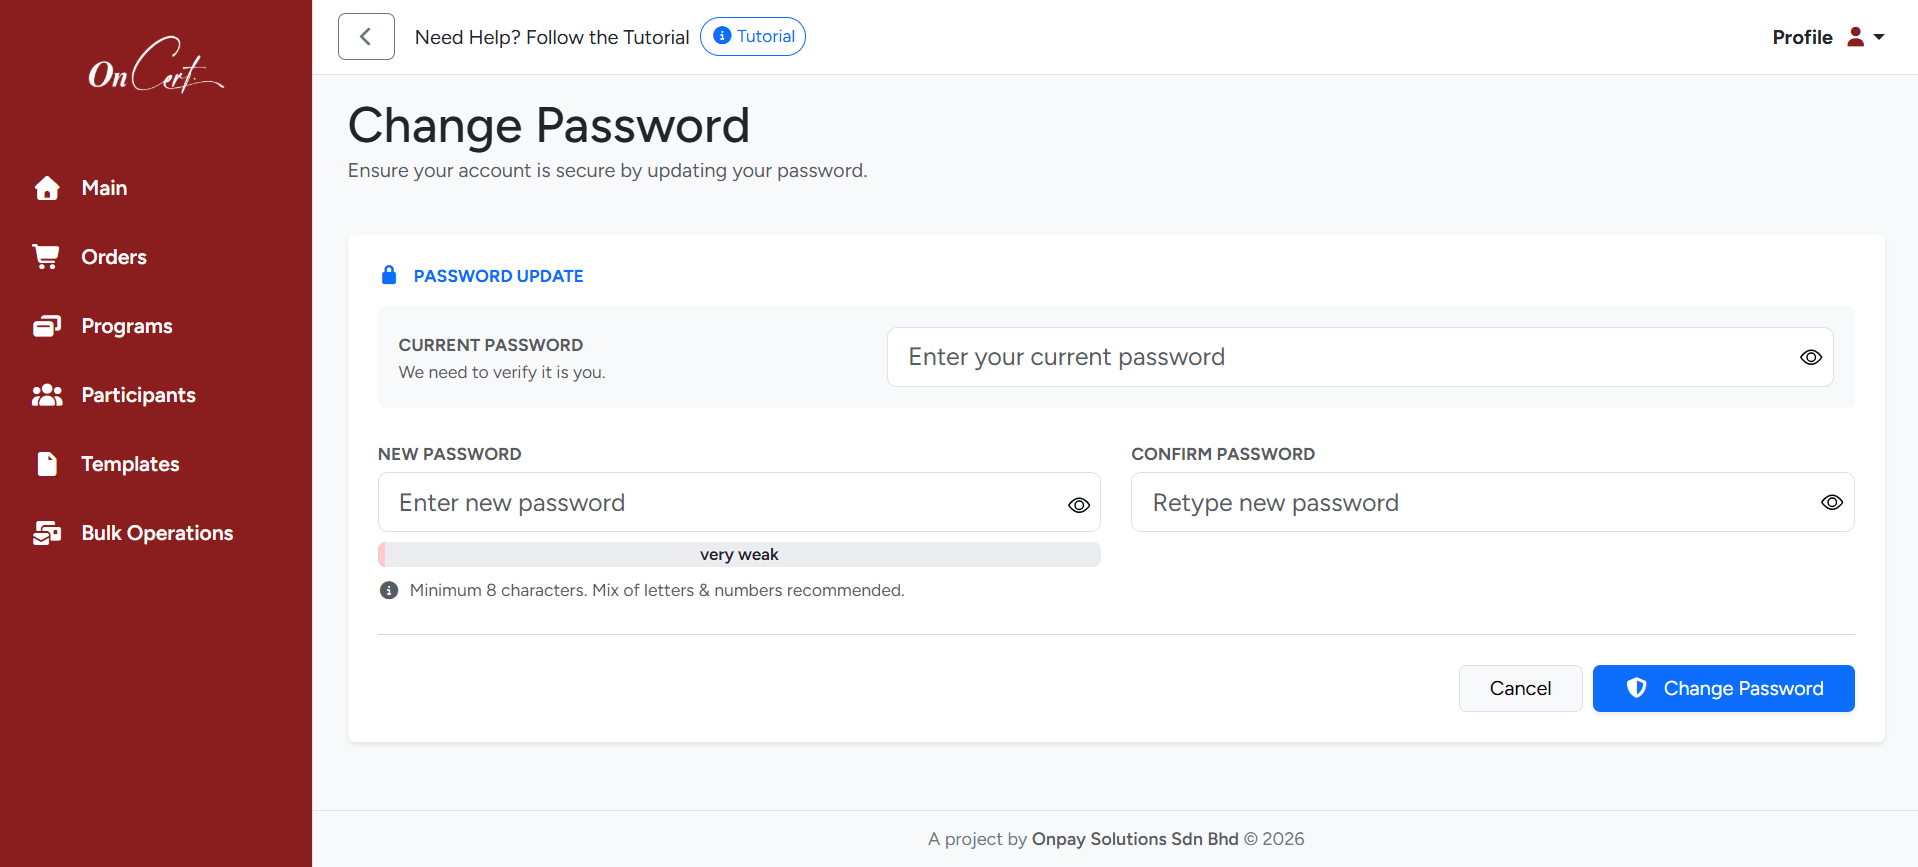 Figure 19: Change Password Form
 Note: For more detailed instructions or specific use cases, please contact our support team for assistance.